Saturday, March 31, 2012

Rocky Crunch

It was Rocky's last day of pre-KG. He's moving to LKG class next week, hooray! My husband and I are very happy with his progress. Rocky used to be shy around other people. He used to cry all the time when we drop him to school. His teacher also said that he used to sit by himself and would not play or talk to his classmates. He was also very dependent at home, especially to his nanny. Whenever we asked him about school, he would say, "I don't like school. I want to stay home. I don't like my classmates. I don't want to play with them."

But nowadays, he's singing a different tune, "I like school. I like my friends. I color. I like Teacher, she's nice. Look Mommy, I have blue sticker!" Not only did his social skills greatly improved, he's more independent, he's got initiative, more responsive when given instructions and we're amazed at how fast he can learn things. He's ready for a "proper" school. And we owe it to Rocky's first teacher, Teacher Rashi.

Rocky and Teacher Rashi.
 
So for Rocky's last day in her class, I thought of making something home-made especially for her as Rocky's "thank you" present.

I was going to bake her chocolate chip cookies. But when I got home I realized I ran out of butter and I was already exhausted coming home late from work that I couldn't bring myself to go the the store and pick up a stick of butter.

So, off to plan B. But what is plan B? I better go check what's in my cupboard...

I've got creamy peanut butter, marshmallows and rice krispies. Great! I have chocolate chips for my cookie recipe, perhaps  avalanche bars or chocolate blizzard bars? But wait, I don't have white chocolate chips! Don't panic Haidee, keep looking. What's this? A Kitkat! Maybe I can make this work.

And I did!

The recipe was adapted from Mel's Kitchen Cafe's Chocolate Blizzard Bars but instead of white chocolate chips I replaced it with Kitkat milk chocolate. It taste absolutely fabulous! Love the crunch of the chocolate covered wafer and rice krispies, the gooey-soft texture of the marshmallows and the smoothness and creaminess of the chocolate-peanut butter. It's heaven in every bite.

And that is why I called it "Rocky Crunch", its crispy and covered with muddy-colored chocolate. Ok, that and because I made it especially as Rocky's present.

Here's the recipe for Rocky Crunch:

1 cup            Hershey's semi-sweet chocolate chips
1/4 cup        creamy peanut butter
1 1/2 cups    Kellogg's Rice Krispies
1 cup            mini marshmallows
1 bar             Kitkat milk chocolate, cut into small squares

Direction:

1. Line baking sheet with parchment paper. Set aside.

2. In a double broiler, melt chocolate chips in medium heat, stirring occasionally. Take extra care not to let the water touch the bottom of the bowl where the chips are melting.

3. Once the chocolate chips melted, add the peanut butter until well combined. Remove from heat and let stand for 15-20minutes. Do not add other ingredients until the mixture cooled down or else everything will melt.

4. Add rice krispies until well combined. Then add the marshmallows and Kitkat.

5. Transfer the mixture onto the lined baking sheet. Gently press the mixture until lightly packed. Let cool and set for 6 hours or overnight before you cut them into bite-sized squares. If you're in a hurry, you can pop it in the freezer and it's set in 30 minutes! The only problem with this freeze-fast-tracking method is that it will melt easily if not stored in the fridge. So it is still best to let it set at room temperature.


While waiting, Rocky's dad helped him write a "thank you" note for his teacher which will also serve as a gift tag.


After 30 minutes, rocky crunch was set and i cut it into 1 1/2  inch squares. And this is how I packaged it:

Put Rocky Crunch squares in a mason jar or recycled jar. Cut a page of an activity book to cover the lid and tie a paper twine with gift note around the lid and voila! An edible gift made with love. Easy peezy!

So there you have it, a "sweet thank you in a jar".


My little boy is growing up so fast! Here are some photos of Rocky with his classmates taken on his last day in Pre-KG class.
This is so funny. Rocky was seated at the back when I came to pick him up. When he saw me with my camera, he said to his classmates, "c'mon, (my) mommy will take our picture." And his teacher said, "...and he went straight to the girls." LOL!


26 March 2012
Home-cooked Meal


Carrot Chocolate Chip Cookies

My son, Rocky is a picky eater. It is a challenge to get him to eat, much less to get him to try unfamiliar food. This stretches me to be more creative and "deceptively" add ingredients to his favorite food.

Tonight, I made his favorite treat, chocolate chip cookies. What he didn't know is I added mashed carrots in it. I don't think he can tell that there's carrot in them, except for the tiny specks of orange in the cookie. And it helped the cookie to stay moist and chewy. Even my husband loved it!


Here's the recipe for this healthy, yummy treat.

Ingredients:
2 cups + 2 tbsp all purpose flour
1/2 tsp baking soda
1/2 tsp salt
1 1/2 sticks unsalted butter, melted and cooled to near room temperature
1 cup granulated sugar
1 large egg + 1 egg yolk
2 tsp vanilla extract
1/4 cup mashed carrots
1 1/2 cups semi-sweet chocolate chips

Direction:
1. Preheat oven to 160*C.

2. Line baking sheet with parchment paper. Set aside.

3. Roughly chop 1 medium-sized carrot and steam until tender. Mash. Cool to room temperature.

4. In a mixing bowl, sift together the flour, baking soda and salt. Set aside.

5. In a stand mixer, mix butter and sugar in low speed. Beat in the egg, egg yolk and vanilla until combined. Gradually add dry ingredients. Mix in the mashed carrots and 1 cup of the chocolate chip.

6. Scoop 1 tbsp of cookie dough on to the baking sheet. From the remaining 1/2 cup chocolate chips, add a few morsels of chips on top of the cookie dough. Depending on the size of your baking sheet, you can line 9-12 cookie dough, 1 1/2 inch apart.

7. Bake for 12-15 minutes or until the edges of the cookies are brown.

8. Cool the cookie on the sheets for at least 15 minutes.

Makes 36 cookies.


 30 March 2012
Home-cooked Meal

Thursday, March 22, 2012

Bacon and Spinach Whole-Wheat Spaghetti


Whole wheat, spinach, garlic, EVOO...these stuff are not only delicious but good for you. And a little sprinkle of bacon bits will not hurt you at all. Here's how you can enjoy this pasta, guilt-free.

Ingredients:

200g whole wheat spaghetti pasta
200g fresh spinach
100g bacon, diced
1 head garlic, minced
1/4 cup white wine
3 tbsp extra virgin olive oil
freshly cracked salt and pepper to taste
freshly shaved parmigiano reggiano, optional

Direction:

Cook pasta in salted boiling water until al dente. Drain.

Cook the bacon in 1 tbsp EVOO until crispy. Remove from pan and set aside.

Add 2 tbsp of EVOO to the bacon dripping and sautee the garlic for about 2 minutes on medium heat.
Deglaze the pan using 1/4 cup of wine. Simmer for a couple of minutes until the wine is reduced to about 1/8 of a cup.

Add the spinach and allow it to wilt.

Then, add the pasta and half of the bacon bits.

Lastly, season with salt and pepper to taste.

To serve, add the remaining bacon bits and freshly shaved parmigiano reggiano on top.


12 March 2012
Home-cooked Meal

Panna Cotta with Red Wine Syrup and Blueberries


Panna cotta is an italian dessert made by cooking cream, hence the name which literally translate to "cooked cream". This dessert is best served chilled and is perfect on a hot summer day.

This recipe is adapted from David Lebovitz, but I used crème fraiche instead of heavy cream.

Ingredients:
PANNA COTTA
2 cups crème fraiche
¼ cup granulated white sugar
1 tsp vanilla extract
3 tsp powdered gelatin
3 tbsp cold water

RED WINE SYRUP
1 cup red wine*
½ cup sugar
2 tsp vanilla extract
1 pc cinnamon stick
*For the red wine, I recommend something sweet and fruity, like Pinotage. However there is no hard rule on choosing red wine for cooking.It is best to use whatever you enjoy drinking.

1 cup fresh blueberries


Direction:

Grease ramekins or cups with neutral-flavored oil. You can use canola, corn or vegetable oil. This is done if you wish to unmold your panna cotta before serving, otherwise, you do not need to grease the cups. Wine glasses are perfect to use if you do not want to unmold the panna cotta.

PANNA COTTA:

1. Bloom gelatin in a cold water. Set aside.
For tips on blooming gelatin, check this video.

2. Heat crème fraiche and sugar in a saucepan over medium heat, stirring continuously, until the sugar is dissolved. Do not bring to a boil. Remove from heat when the sugar is completely dissolved.

3. Stir in vanilla extract.

4. Add cream mixture to the gelatin and stir until completely dissolved.

5. Pour the mixture into the prepared cups or glasses.

6. Leave to set for 1 hour then cover with plastic wrap. Place in the fridge for 2 hours or preferably overnight.

RED WINE SYRUP:

1. In a small saucepan, combine red wine and sugar.Add cinnamon stick. Cook over medium heat, stirring continuously until the sugar is completely dissolved and thick bubbles appear. When the sauce has thickened and reduced to about half its original amount, remove from heat.

2. Add vanilla extract.

3. Transfer to a bowl and cool completely.

To serve:
Unmold the chilled panna cotta by running a spatula or knife around the edge of the panna cotta, then dip the bottom of the cup into hot water for 1 minute to loosen the bottom. Place on a plate and serve with fresh blueberries and red wine syrup.

For panna cotta in wine glasses, top it with berries and syrup then serve.


Enjoy!

Tuesday, March 20, 2012

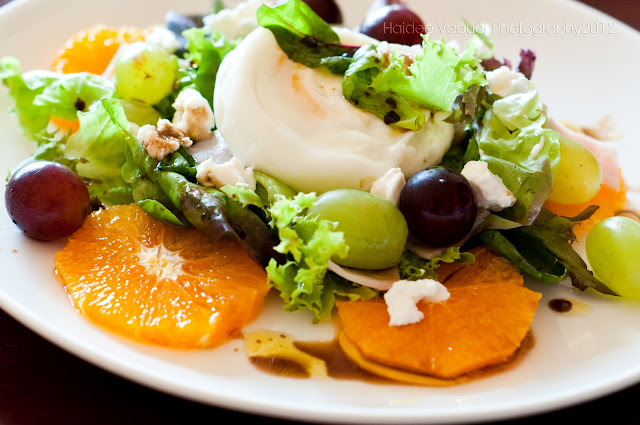
Salmagundi


I found something PINteresting on Pinterest this morning---salamagundi. I thought, what is that? Curious, I wikipedia'd it and found that it is a salad dish that got it's name from the French word "salmagondis" which means a hodgepodge or mix of widely disparate things. (Hodgepodge---what a fun word!).

And I realized I have been making salmagundi, I just didn't know there was a "proper" name for it. I called mine "Maskipaps" salad. Maskipaps is the slang of the Filipino phrase "maski papaano" meaning "anything goes".

Most of the salad I prepared at home are maskipaps a.k.a. salmagundi. I just use whatever I fancy from my fridge and cupboard.

For this specific plate, here are the ingredients:

a bowl of mixed greens
1 mandarin orange, peeled and sliced
1/4 cup red grapes
1/4 cup green grapes
2 slices turkey breast, cut about half an inch
1 egg, poached
2 tbsp ricotta cheese
Dressing:
3 tbsp extra virgin olive oil
2 tbsp balsamic vinegar
1 tsp honey
salt and pepper to taste

Toss all the ingredients together or layer them on the plate. Drizzle with honey-vinegar dressing and sprinkle with freshly ground salt and pepper.

Again, there are no rules; you can just eye-ball the ingredients to suit your liking. Have fun with it and enjoy, guilt-free!


And here's another version posted just recently on instagram: salmagundi of mixed greens, tuna, crabsticks, red apple chunks, sweet corn, poached egg and homemade agave nectar and balsamic vinigrette.
Salmagundi - http://instagram.com/haideekitchen/ - 21 Apr 2013

11 March 2012
Home-cooked Meal

Friday, March 16, 2012

Garlic Ginger Clams in Beer Reduction

Who doesn't love clams? This bivalve is one of my favorite shellfish. We're fortunate enough that in Bahrain, fresh clams are available all year round. And it's so cheap; 500fils per kilo, (that's just over a dollar)! And there are so many ways you can cook them, from soups and chowders, pasta and risotto dishes, or on it's own with spices and herbs. It's so flavorful that whatever way you cook them, they taste great.

Here's one of my favorite clams recipes; a rich, garlicky clams reduced in beer. It's a perfect dish to complement a simple seafood weekend lunch with family and friends.

Ingredients:
3 kg             clams
3 heads        garlic, minced
1/4 cup        ginger, grated
4tbsp           extra virgin olive oil
1/2 stick      unsalted butter
1/2 bottle    beer, I used Grolsch Premium Lager
1 tsp            red chilli pepper, thinly sliced
zest of 1 lemon
1 tsp            salt
1 tsp            pepper, freshly cracked
1/4 cup       scallions, for garnish


Direction:

Steam the clams until shells open. Set aside.

In a wok, heat the olive oil on medium heat. Add garlic and chili. Sautee for 2 minutes. Add the butter and ginger, salt and pepper. Cook for another 5 minutes or until the garlic is slightly brown.

Deglaze the wok with beer and simmer for 2 minutes.

Add the clams and lemon zest and toss.

Remove from heat and serve immediately garnished with green scallions on top.

Makes a fiesta serving for 6-8 people.


16 March 2012
Home-cooked Meal
Banana Chocolate Chip Puffin

I like having fun in the kitchen and playing with my food. This morning as I was making breakfast, I did just that. Instead of cooking pancakes on a skillet, I put them on a greased muffin pan and baked for 10 minutes. The result? Amazing! I got the fluffiness of a pancake and the thickness of a muffin, a puffin!

So here's how I did it:

Prep Time: 5 minutes
Cooking Time: 10-12minutes

Ingredients:
1 cup Betty Crocker pancake mix
2/3 cup low-fat milk
1 egg
1 tbsp canola oil
1 banana, mashed
1/2 cup semi-sweet chocolate chips

Preheat oven at 180*C.

Mix all the ingredients together. Pour the batter into the greased/lined muffin cups, about half-full. Bake for 10-12 minutes or until a toothpick comes out clean when you stick it in the middle of a muffin.

Best served warm, with butter and maple syrup. Enjoy!

Makes 6-8 puffins


09 March 2012
Home-cooked Meal

Paella Mixta

Welcome to my kitchen. For my very first blog, I thought I'd share my signature dish, the Paella.


Paella (Valencian: [paˈeʎa], Spanish: [paˈeʎa]) is a Valencian rice dish that originated in its modern form in the mid-19th century near lake Albufera, a lagoon in Valencia, on the east coast of Spain.[1] Many non-Spaniards view paella as Spain's national dish, but most Spaniards consider it to be a regional Valencian dish. Valencians, in turn, regard paella as one of their identifying symbols.There are three widely known types of paella: Valencian paella (Spanish: paella valenciana), seafood paella (Spanish: paella de marisco) and mixed paella (Spanish: paella mixta), but there are many others as well.
http://en.wikipedia.org/wiki/Paella

This is my version of Paella Mixta, a mix of seafood and chicken. My family and friends love it. It makes a simple dinner a fiesta. Why don't you try and make some yourself? You'll be surprised it's not as complicated as it looks. Enjoy! Buen apetito!

Paella Mixta Recipe
Ingredients:

Meat:
900g or 8pcs chicken thigh, skinned, deboned and cut in half*
250g Spanish chorizo
Seafood:
16 pcs medium sized prawns, deveined, 8 with head, 8 without head
2 pcs medium sized cuttlefish, ink removed, cut into rings
16 pcs mussels
1 kg clams, steamed and shelled (20 pcs w half shell)*
Equipment:
15in Paella pan (also known as paellera), coated with olive oil
Aluminum foil to cover the pan.
5 cups rice, washed
1.5ml or 10 cups of chicken stock*
Extra Virgin Olive Oil
1 large or 2 medium sized red onions, diced
1 head of garlic, minced
1 large red bell pepper, fire-roasted, seeded and cut into strips*
2 240g can of peeled whole tomatoes, seeded, roughly chopped
1 cup frozen green peas
4 tsp paprika
1 tsp cayenne chili pepper
2 tsp saffron
Freshly milled salt and pepper, to taste
1 cup white wine
Lemon wedges, for garnish


Preparation:

The Chicken Stock:
Boil the bone from the chicken thigh in 1.5L water. Simmer for 5 minutes. Set aside.

The Red Bell Pepper:
Roast the red bell pepper on the oven top on high heat. Remove the seeds then cut into strips. Set aside.

The Clams:
Steam the clams in salted water until the shells open. Remove the meat from the shell but set aside 15-20 pieces of clams on half shell for garnish. Set aside.
Note: If you’re using big clams, no need to steam separately. Add the clams the same time you add the mussels.

The chicken and seafood must be lightly seasoned with freshly milled salt and pepper.

The Paella pan:
Generously coat the paella or paellera with extra virgin olive oil, (even if the pan you are using is non-stick).

Direction:

Preheat the Oven to 200*C.

Sauté the chicken in oil until half-cooked. You may season with salt and pepper while sautéing. Set aside.


Sauté the onions and chorizo for 1 minute then add garlic, tomatoes, half of the roasted bell pepper, paprika, cayenne pepper, saffron, salt and pepper. Pour in the wine, shimmy the pan and simmer for another minute.

Add the rice, mix thoroughly until the rice is evenly coated. Add half of the broth, then stir to evenly coat the rice. Arrange the mussels on the side of the pan. If you’re using uncooked large clams, arranged it evenly and plant them on the rice to ensure that it cooks well. Add the remaining broth and bring to boil. Turn the heat down and simmer for 7-10 minutes, uncovered, shaking and turning the pan occasionally.

Once the rice is nearly cooked, assemble the remaining ingredients on top: chicken, steamed clams, cuttlefish, prawns, the remaining roasted bell pepper and green peas. Cover with aluminum foil and simmer for 5 minutes in low heat, shaking and turning the pan occasionally.


If the liquid has not completely dried after 5 minutes, put the pan into the oven and bake until the liquid has been absorbed.

Garnish with lemon wedges. Serve immediately.

Makes a hearty serving for 10 people.

Wine Pairing Suggestion: Good with Medium-bodied, fruity, semi-sweet white wine. My personal favorite is Chenin Blanc, Sauvignon Blanc and Chardonnay. Pairing with Sangria is also a good choice.

30 September 2011
Home-cooked Meal